I will show you a sew and no-sew method to make your very own cute and sparkly monogrammed pillow cases. These customized case scan simply give your old pillows a total make over and could totally change the color theme in your room. Decorated pillows add a nice and lovely cozy feel, or a splash of color to decorating your living room or your bedroom.
Okay, so some of the tools and materials I will be using for this tutorial are some measuring rulers, a pair of scissors, pins, and of course a pillow. And, if you’re not sewing you will need some iron on adhesive, or you could also use fabric glue. Next, I will be using one yard of printed fabric and another one yard of just plain inexpensive fabric. This helps me cut down my cost in fabrics all together by using a more in expensive kind for the back part of my pillow and something more nice and fancy for the front.


Okay, so let’s jump right into this, shall we? Now, start by laying your fabric down with the right sides facing downward and the wrong sides facing you. Draw out the shape and size of your pillow. I will be making a basic square for myself and everyone’s pillow measurements will be different. So, what I would suggest for you to do is add half an inch to one inch in seam allowance. And, basically what a seam allowance is that extra part near the edge where you will be sewing or gluing.
Okay, so here I’m just basically folding my fabric together so that way I can cut out two squares. Okay, so with this part right here I’m basically doing the same thing except I am using a different type of fabric for the back part of my pillow. And, draw out your square or whatever shape it is. Next, add six to ten inches on your vertical line and basically my shape is going to come out as a rectangle. So, I’m basically doing the same thing right here except I’m making a rectangle this time. Now, I’m just going to double up on the fabric and cut out two rectangular pieces.
Okay, so now with the two pieces on top of each other doubling up just like this. I’m going to find the mid-point and draw a line across. And next, I’m just going to cut it down the line. Now, I have four smaller rectangles. Separate them into two sets, one set per pillow. Okay, so it’s time to finish the raw edges on the rectangles. Starting with one set takeout two small rectangles and take one of the longer sides per rectangle and press it in half an inch with a heated iron.
Now, if you’re going to use that iron on adhesive tape then make sure to place that in between the wrong sides of the fabric. And, if you’re going to use fabric glue, or sew it in then do that after pressing in your seam. Once you’re complete you should have something that looks like this and remember to do this only on one side of your rectangle. Okay, so now it’s time to bond the front of the pillow to the back of the pillow. If you’re not sewing your pillow then lay the iron on adhesive to all four sides of your square or whatever shape your pillow is.
Now, place one of the small back rectangle pieces to match the two corners of the square. Make sure that your finished edge is in the center of your square, just like how I have it right here. Go ahead and press it down with your hot iron. Repeat with the second back piece, it should overlay the other rectangle. Make sure to add extra adhesive or glue to the few extra inches that overlaps. Once everything is in place go ahead and press it down with your hot iron, make sure that you get all four sides nicely.
And, if you’re using synthetic material then be careful not to melt your fabric and I would highly suggest for you to use a towel or something between the hot iron and your fabric. If you are sewing, it’s pretty similar here. Just sew on the first rectangle and then pin in the second piece and then sew it. Again, make sure to have the middle overlap by a few inches and that all your corners match evenly. Once you’re complete with bonding all four sides of your pillow or sewing it the next thing to do is snip off the corners so that way there won’t be any bunching on the inside and that your corners will stick out.
If you’re bonding then be careful not to over cut it because you don’t want the glue to come apart. This is the part that you’ve been waiting for. Go ahead and turn the pillow inside out to see the finishing result. Isn’t it cute? I just love it. Now, you could stop here if you like, but if you want to add a personal touch by adding some initials or a monogram or any type of prints then you can continue on watching. To create a flat platform just simply put in a magazine or a piece of cardboard. This will help protect the fabric paint from seeping through.
Next, I printed out some letters from my computer and these came out a lot smaller than what I wanted it to look like. So, I’m just adjusting it a little here and there adding my little touch to it. Once I’m all set all I have to do is cut this out and then I’m going to take this letter and then trace it onto the vinyl decal sticky paper. So, after I transfer my design onto the vinyl decal sticky paper what I’m going to do next is just cut it out with an X-acto blade. Okay, so my cut lines a real ready on my sticky paper and now I am just sticking this onto the pillowcase.
And, I would suggest for you to take out a ruler or something like this and just, you know, go slowly as you’re doing it. After that I’m peeling off that letter A and just flattening all the edges around making sure there’s no air bubbles. So, here I’m using a base paint to paint over my letter. And, once that’s dried I am going to use a gold paint to match the color of my glitter. Before the gold paint dries up go ahead and sprinkle on your glitter so that way it could stick to the letter. Next, let the glitter dry overnight and in the next morning cover the glitter with some gloss to prevent any fall outs.
And, after a few lovely hours peel off the sticker paper to find a clean and lovely looking design or monogram letter.
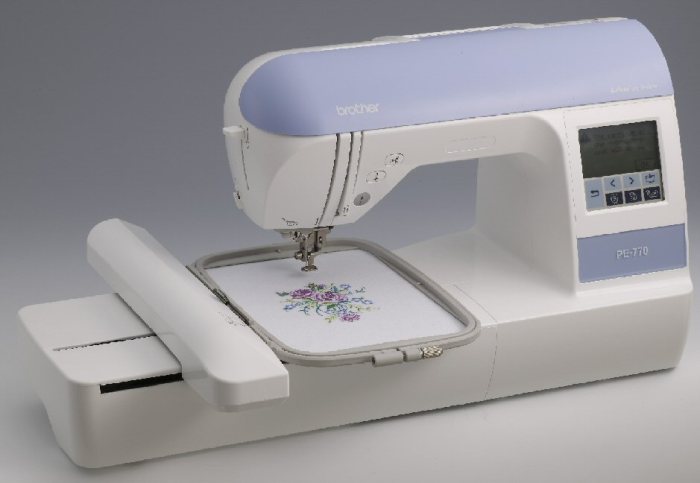
 The Brother PE700 embroidery machine is one of the most popular Brother Embroidery machines. It is so fast indeed that you can practically finish all of your sewing in half the time it would usually take if you were to use a different embroidery machine. So if you are one that doesn’t have the necessary time to sit for hours with a needle and a thread then the PE700 will be exactly what you need.
 I learned some basic embroidery techniques from her but lost interest in my teenage years. I recently started making my own outfits again and doing some simple